
OBS webcam stream: awesome, but wasteful
On my Mac at home, I have OBS set up to fetch my guinea pig webcam stream using RTSP. This allows me to use it as a virtual camera background (to make work meetings 200% more adorable). It also allows me to take recordings or stream to Twitch/YouTube/wherever.
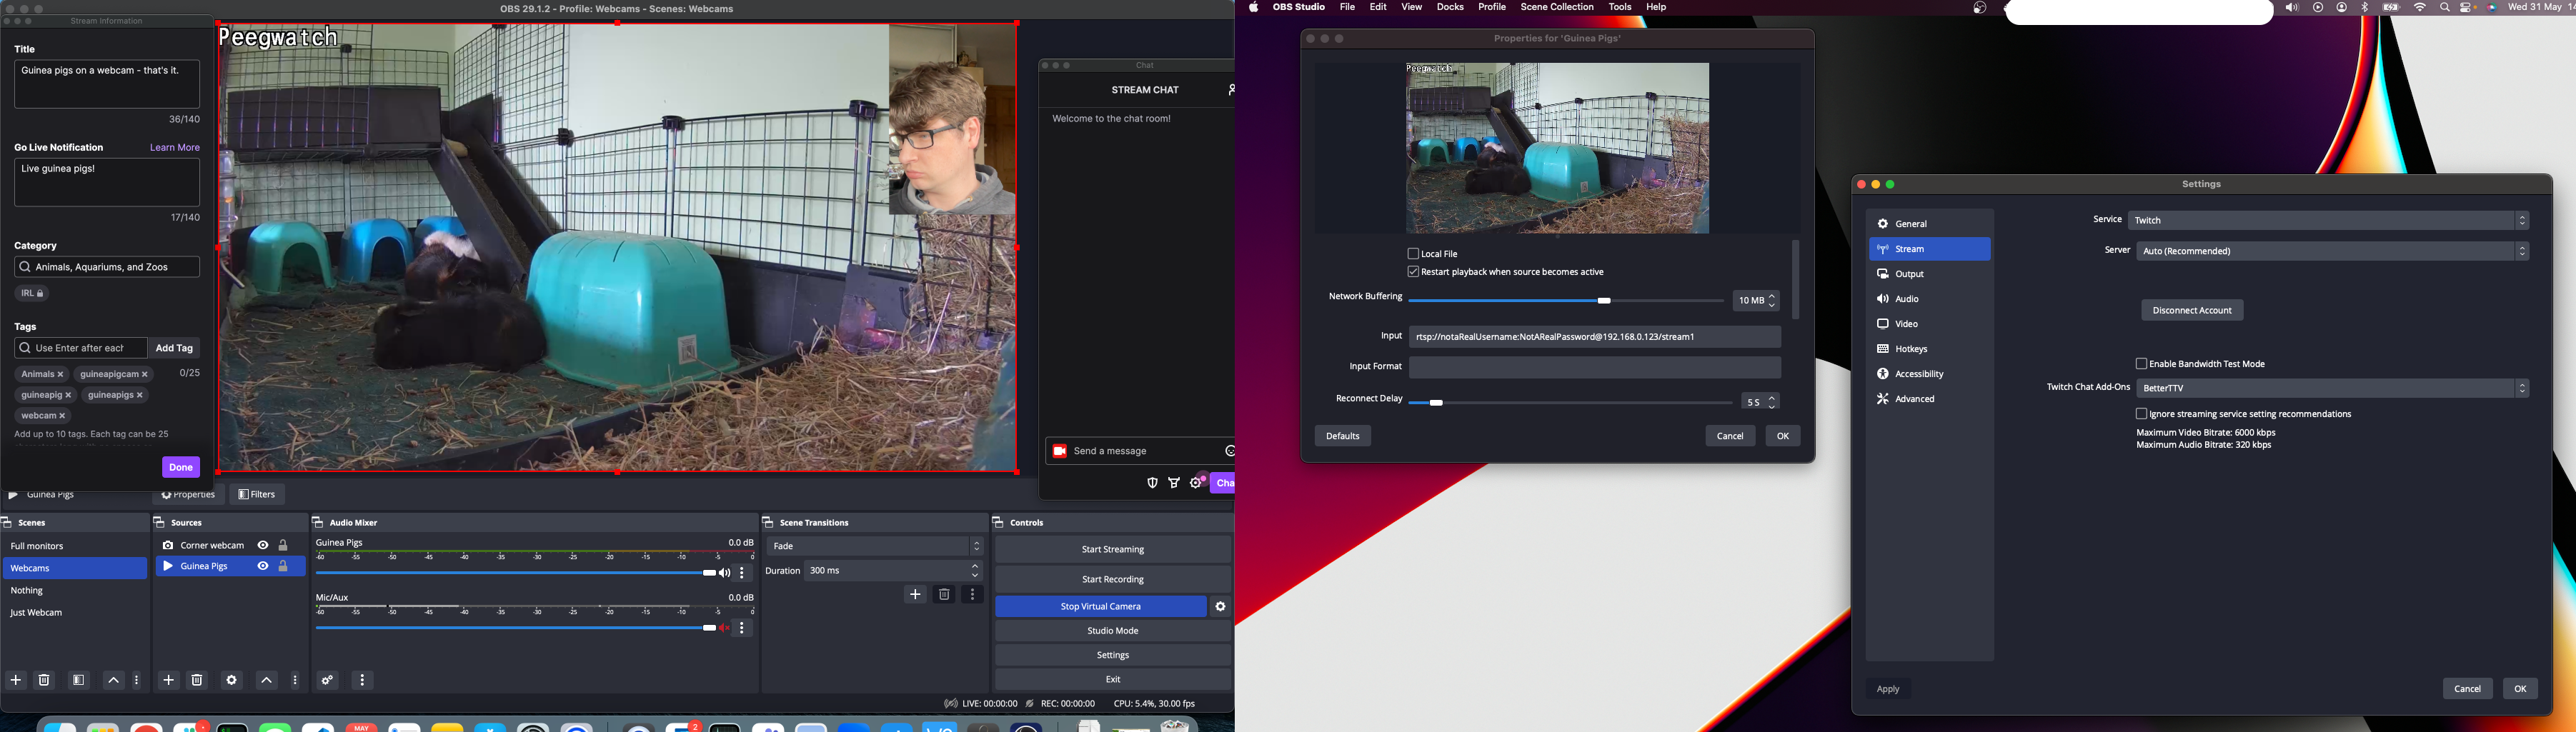
This setup is all I would need for a basic guinea pig Twitch stream, with lots of opportunities for tweaks and enhancements. To keep the stream going, I would need to leave my computer on and disable auto-sleep. This is a massive waste of energy, and would wear out components faster than I would like. If you haven’t guessed already, there’s an obvious answer to this dilemma: use a Raspberry Pi instead!
It’s possible to stream a webcam from a Raspberry Pi using an equivalent OBS setup, but you will likely need a Pi 4 with a decent amount of RAM and a beefy swap file, and good luck getting hold of one. Hopefully, like me, you have an old Raspberry Pi 2/3 lying about instead.
Note: this tutorial includes some Amazon affiliate links. I will include the non-affiliate versions in the footer of the post.
Stream your webcam via Raspberry Pi, the Linux way
Instead of barely running OBS Studio on a souped-up Raspberry Pi, we can follow the Linux tenets instead. This means crafting a solution that mixes multiple programs/technologies to produce a solution that does what we need it to. OBS is powerful and flexible, but it’s not strictly necessary for my use case. It also requires manual user intervention when the Pi reboots.
To get an OBS alternative up and running, we can use Datarhei Restreamer, an open source video server. It has a video player and admin interface, so you can easily preview your stream and send it wherever.
The Restreamer app runs via Docker, which makes it incredibly easy to set up with little-to-no DevOps knowledge.
You will need…
To stream your webcam on Twitch using this method, you will need:
- An internet-enabled webcam/home security camera that supports RTSP, connected to your network via Ethernet or WiFi. I have a TP-Link Tapo C200* (now superseded by the Tapo C210*), but most consumer-grade webcams* should do the trick. Note that battery-powered webcams (e.g. doorbell cameras) tend not to support RTSP.
- In the configuration for your camera, you should be able to set a username and password, and also view the IP address of the camera. Note this down for later.
- The documentation for TP-link cameras also specify specific URL paths for viewing the HD and SD versions of the webcam feed, so check your camera’s online documentation to see if yours has something similar.
- A Raspberry Pi 2/3/4/Zero (ideally 4), connected to the Internet via WiFi or Ethernet. I used a Raspberry Pi 3B+ because that’s what I already owned. Datarhei’s FAQs say that all of these models should be viable, but the 4 is best because of its superior graphics capabilities.
- An SD card loaded with the latest stable version of Raspberry Pi OS, Debian or Ubuntu. I used Raspberry Pi OS, which at the time of writing is based on Debian 11 Bullseye.
- A fast broadband connection and router capable of supporting a constant upload speed of 2-8 Mbps (depending on video quality and number of connected services) alongside your regular internet usage. You can use Fast.com‘s ‘Show more info’ button to view your current upload speed after the initial test has run.
- A Twitch account with a stream key configured.
- Most importantly, something interesting to point your webcam at! Pets, bird feeders, coffee pot etc.
Optional improvements
To maximise the reliability of your webcam stream, here’s some bonus tips:
- You can enable SSH and/or VNC on your Pi to to control it remotely from another computer on your network. This eliminates the need to connect a keyboard, mouse and monitor to the Pi.
- For improved reliability and connection speed, connect your Pi to your router using Ethernet. Typically this involves powerline adapters* unless you have a working LAN setup in your house.
- You can do the same for your camera if it has an Ethernet port, but many of them don’t.
- You should also configure your router to assign static IP addresses to your Pi and your camera. This will ensure that the internal IP addresses of these devices stay the same when they reboot. Search ‘[your router make and model] reserve IP address’ to find out how to do this.
Getting hold of all the hardware is probably the most difficult part of this tutorial. Everything from here on in is mainly just copying and pasting, then configuring your webcam stream via the Restreamer Admin UI.
Install Docker and Restreamer
First, login to your Pi using a mouse + keyboard + monitor, or connect to it remotely via SSH or VNC. You won’t need any peripherals connected to your Pi if you’ve configured it for remote access. Open the Terminal app to get a command prompt. If you’re following this tutorial on the Pi, you might want to open this tutorial in your Pi’s browser.
Note: the Restreamer docs mention a --privileged option in their example docker run commands. This won’t be needed for an internet-enabled webcam, but you will need to include it if you’re connecting to a webcam that is physically connected to your Pi.
Option 1 – Docker Run
Once you’ve connected to the Pi via whatever means, follow the official guide for installing Docker on Rasperry Pi OS. After that, follow the Linux post-install steps. This ensures that Docker restarts automatically after a reboot and that you don’t need root access or sudo to run Docker commands.
Next, you’ll want to install Restreamer as an auto-restarting Docker container, with volume mounts and port-forwarding. Sounds complicated, right?
Thankfully, we can do this in a single Docker command:
docker run --detach --name restreamer --volume /opt/core/config:/core/config --volume /opt/core/data:/core/data --publish 8080:8080 --publish 8181:8181 --publish 1935:1935 --publish 1936:1936 --publish 6000:6000/udp --restart=always datarhei/restreamer:latestDocker Run command explainer
That’s a long command, so let’s break this down a little:
dockerrunis our chosen Docker command. Its job is to run the specified Docker image using the provided options (if any).--detachensures that the Docker container will run in the background and will persist after the SSH/Terminal session ends.--name restreamerensures that our running Docker container has a sensible and meaningful name. If we leave this blank, Docker will assign it a random name instead.--volume /opt/core/config:/core/config --volume /opt/core/data:/core/datacreates two bind mounts on your Raspberry Pi’s native system, both in the/opt/directory. This is where the configuration and data storage for the Restreamer app will live. Bind mounts are a very basic type of volume that allow you to delete the container or move it to a new device without losing all your configuration and data.--publish 8080:8080 --publishis where you set up the port forwarding. The part before the colon is the destination port on the host (Pi), and the part after the colon is the port in the container that you are mapping. If you were hosting the Restreamer UI outside your local network, you would likely want to have mappings of8181:8181--publish 1935:1935 --publish 1936:1936 --publish 6000:6000/udp80:8080(HTTP) and443:8181(HTTPS) so that the UI could be accessed without having to specify custom ports.restart=alwaysensures that the Docker container restarts if it crashes or if you reboot the Pi. Note that you will need to complete the Linux post-install steps for Docker to start automatically when the Pi reboots.- Finally,
datarhei/restreamer:latestis the only non-optional part of theruncommand. This is the Docker image you are pulling from Docker Hub (other Docker repositories are available). The:latesttag ensures that you’re pulling whatever version of the image that Datarhei have tagged as ‘latest’, which in practice may not actually be the most recent version.
Option 2 – Docker Compose
Hopefully my explanation helps break down that long command into manageable parts. But one big problem with these lengthy Docker commands is that you have to keep a note of them (or find the same tutorial again) if you ever need to start from scratch. Thankfully, there is a better way.
Docker Compose is a tool that’s now included by default when you install Docker. It allows you to distribute reproducible Docker builds as YAML files, removing the need to copy and paste lengthy docker run commands. It’s especially useful when you have multiple containers powering a single app, but we can use it for single container apps too.
Using Compozerize, I generated an equivalent docker-compose.yml file that you can copy onto your Pi and keep forever:
version: '3.3'
services:
    restreamer:
        container_name: restreamer
        volumes:
            - './config:/core/config'
            - './data:/core/data'
        ports:
            - '8080:8080'
            - '8181:8181'
            - '1935:1935'
            - '1936:1936'
            - '6000:6000/udp'
        restart: always
        image: 'datarhei/restreamer:latest'
To get this onto your pi, open a Terminal window (or start a remote SSH session), then navigate to your home directory:
$ cd ${HOME}Create a new directory for the restreamer app. Next, navigate to the directory and pull down the docker-compose file from GitHub:
$ mkdir restreamer
$ cd restreamer
$ wget https://raw.githubusercontent.com/rightsaidjames/restreamer-example-files/main/docker-compose.yml
(you’re welcome)
Finally, run this command to launch your Restreamer app as a self-restarting Docker container:
$ docker compose up -dCommand breakdown (again)
This is obviously a much simpler command, but let’s break it down anyway:
docker composeis the tool we’re using to parse thedocker-compose.ymlfile, with lots of sub commands that do various things. It used to be a standalone tool (docker-compose), but it’s now part of the main Docker program.uptells docker-compose to download the Docker image (if it doesn’t already exist locally), set up the volumes, mounts etc. specified in the file, and launch the container(s).-d(or--detach) tells theupcommand to keep the container(s) running in the background after it has started.
You might notice in the docker-compose.yml file that I’ve changed the destinations for the volume mounts compared to the original docker run command. For example, './config:/core/config' means that a directory called config will be created in the current directory (/home/yourusername/restreamer/), mirroring the files in /core/config in the Docker container.
For those skipping straight to this section, I’ll repeat this note about port mapping:
If you decide to host the Restreamer UI outside your local network, you can set mappings of '80:8080' (HTTP) and '443:8181' (HTTPS) so that the UI could be accessed without having to specify custom ports.
Restreamer setup
Okay, the DevOps part is over. We won’t need to run any more Docker commands unless/until we decide to stop or decommission the Restreamer app. Assuming you’ve followed all of the above instructions correctly (either the docker run or docker-compose option, not both!) then you should see something like this in your Terminal:
![➜ restreamer docker-compose up -d
[+] Running 2/2
⠿ Network restreamer_default Created 0.0s
⠿ Container restreamer Started 0.3s
➜ restreamer](https://rightsaidjames.com/wp/wp-content/uploads/2023/06/Screenshot-2023-06-01-at-14.51.49.png)
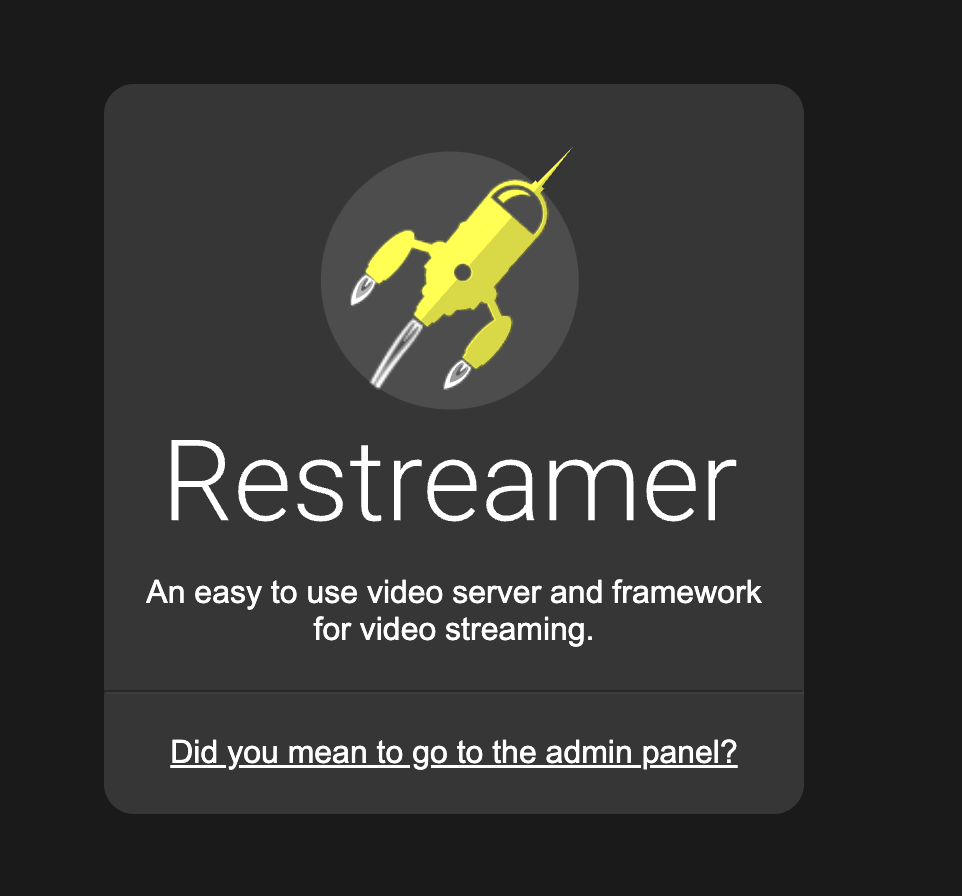
docker-compose.yml file or a docker run command once, and then run it anywhere where Docker is installed.Open the Restreamer UI in your Pi’s web browser by visiting http://localhost:8080 , or go to http://[your Pi’s local IP address]:8080 (e.g. http://192.168.1.10:8080/) from any computer on your local network. You should see something like this:
Click the link, then copy the generated password into the Confirm password field (or specify your own) and submit the form. For extra security by obscurity, choose a different username as well.
![Heading: User registration
Enter username form field: admin
Enter password form field: W2D6LL-d2esjx-tS4yZe
Confirm password form field: [empty]
Button: Register User](https://rightsaidjames.com/wp/wp-content/uploads/2023/06/Screenshot-2023-06-01-at-15.41.02.png)
Add webcam stream to Restreamer UI
Click through the wizard, selecting Network source at the video setup stage. At this point, you’ll need the IP address, URL path (if applicable), username and password for your camera. Here’s what this looks like for me:
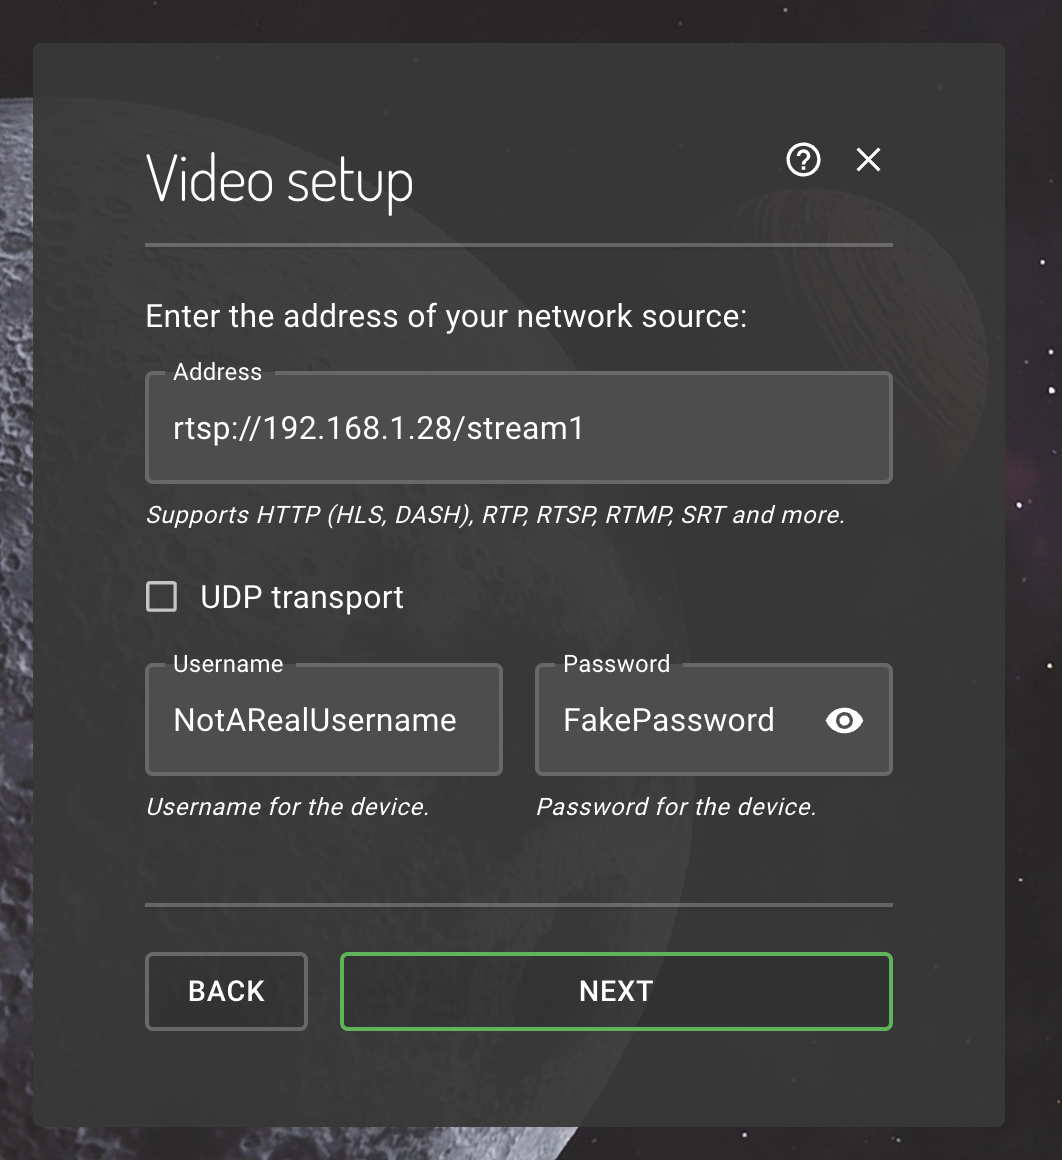
rtsp://192.168.1.28/stream1 for the Address of the camera to get the HD feed, then entered the username and password I’d chosen for the camera.For the rest of the video and audio setup, accept the default options unless something seems incorrect. If offered a choice of video quality, choose 1080p (or higher) if available. At the Metadata step, you can specify a name, description and author details. However this info won’t be visible on Twitch so feel free to ignore it for now. Finally, choose a Creative Commons license. I chose CC-BY-NC 4.0, but this won’t be visible on Twitch so it’s fine to stick with the default option.
If all goes well, your end result should look like this – guinea pigs not included!
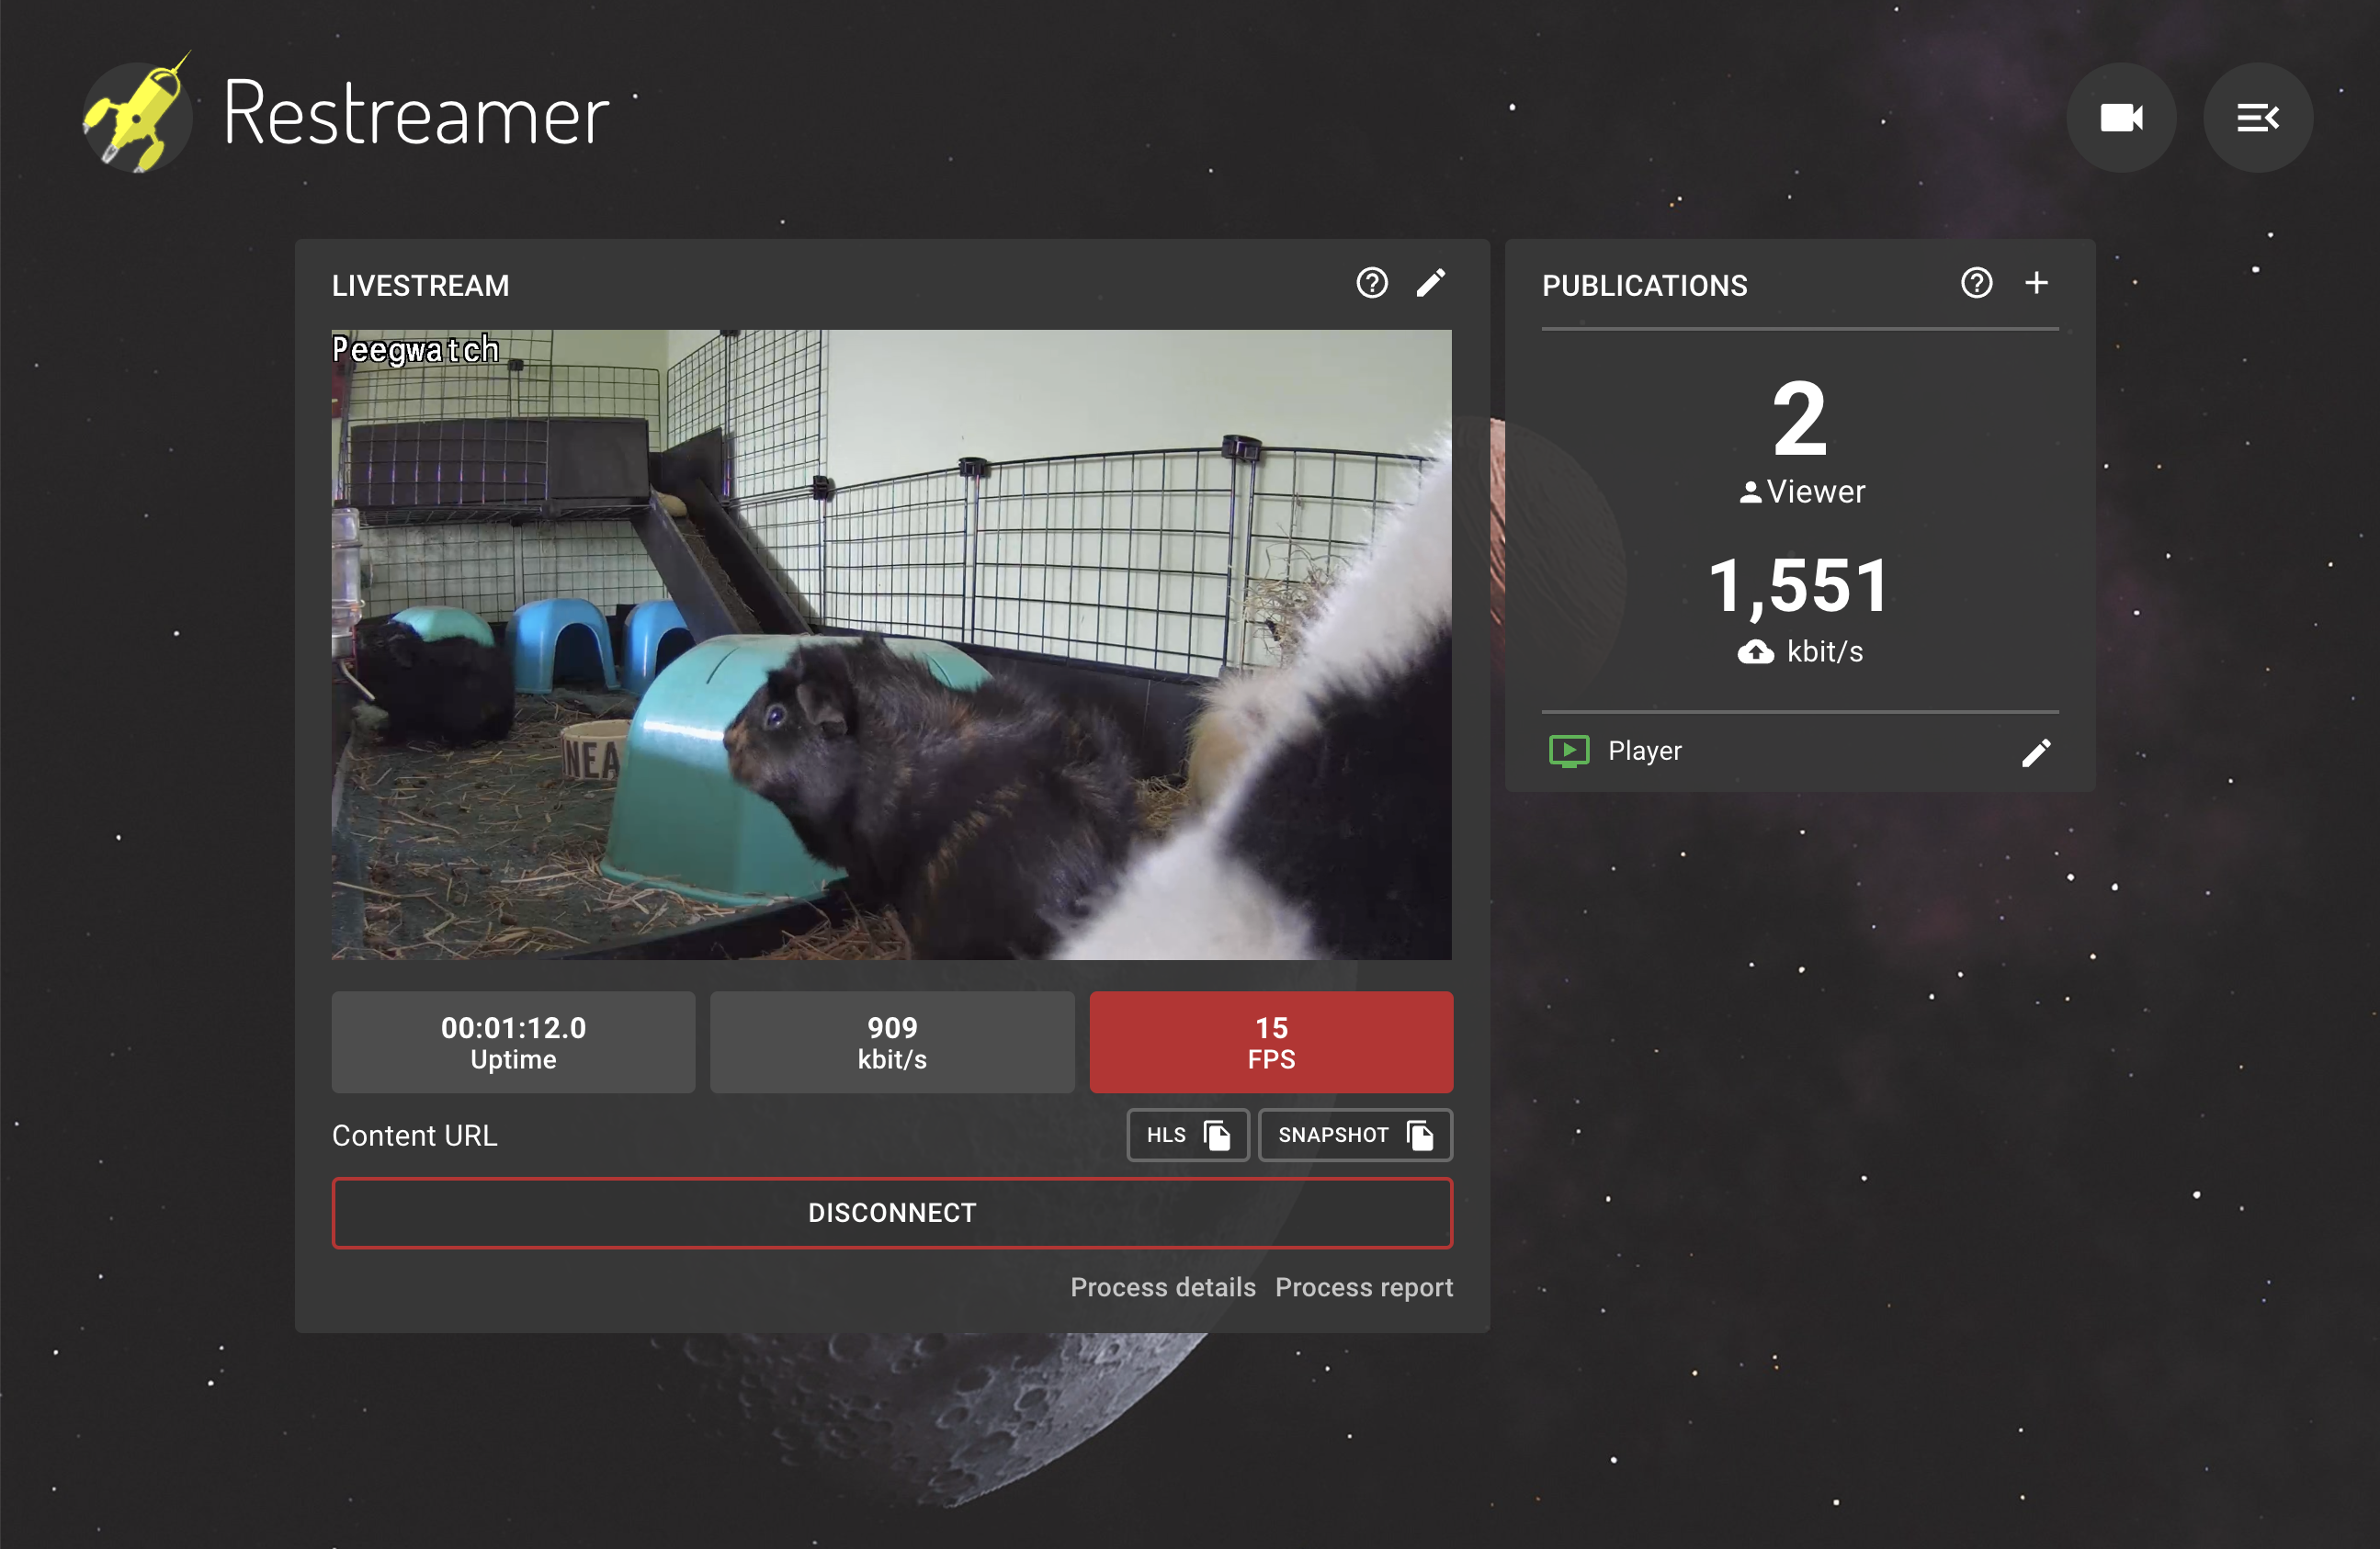
All that’s left now is to connect your webcam stream to Twitch!
Broadcast webcam stream on Twitch
Here comes the satisfying part. We’re going to configure our Restreamer app to broadcast our webcam stream directly to our Twitch account.
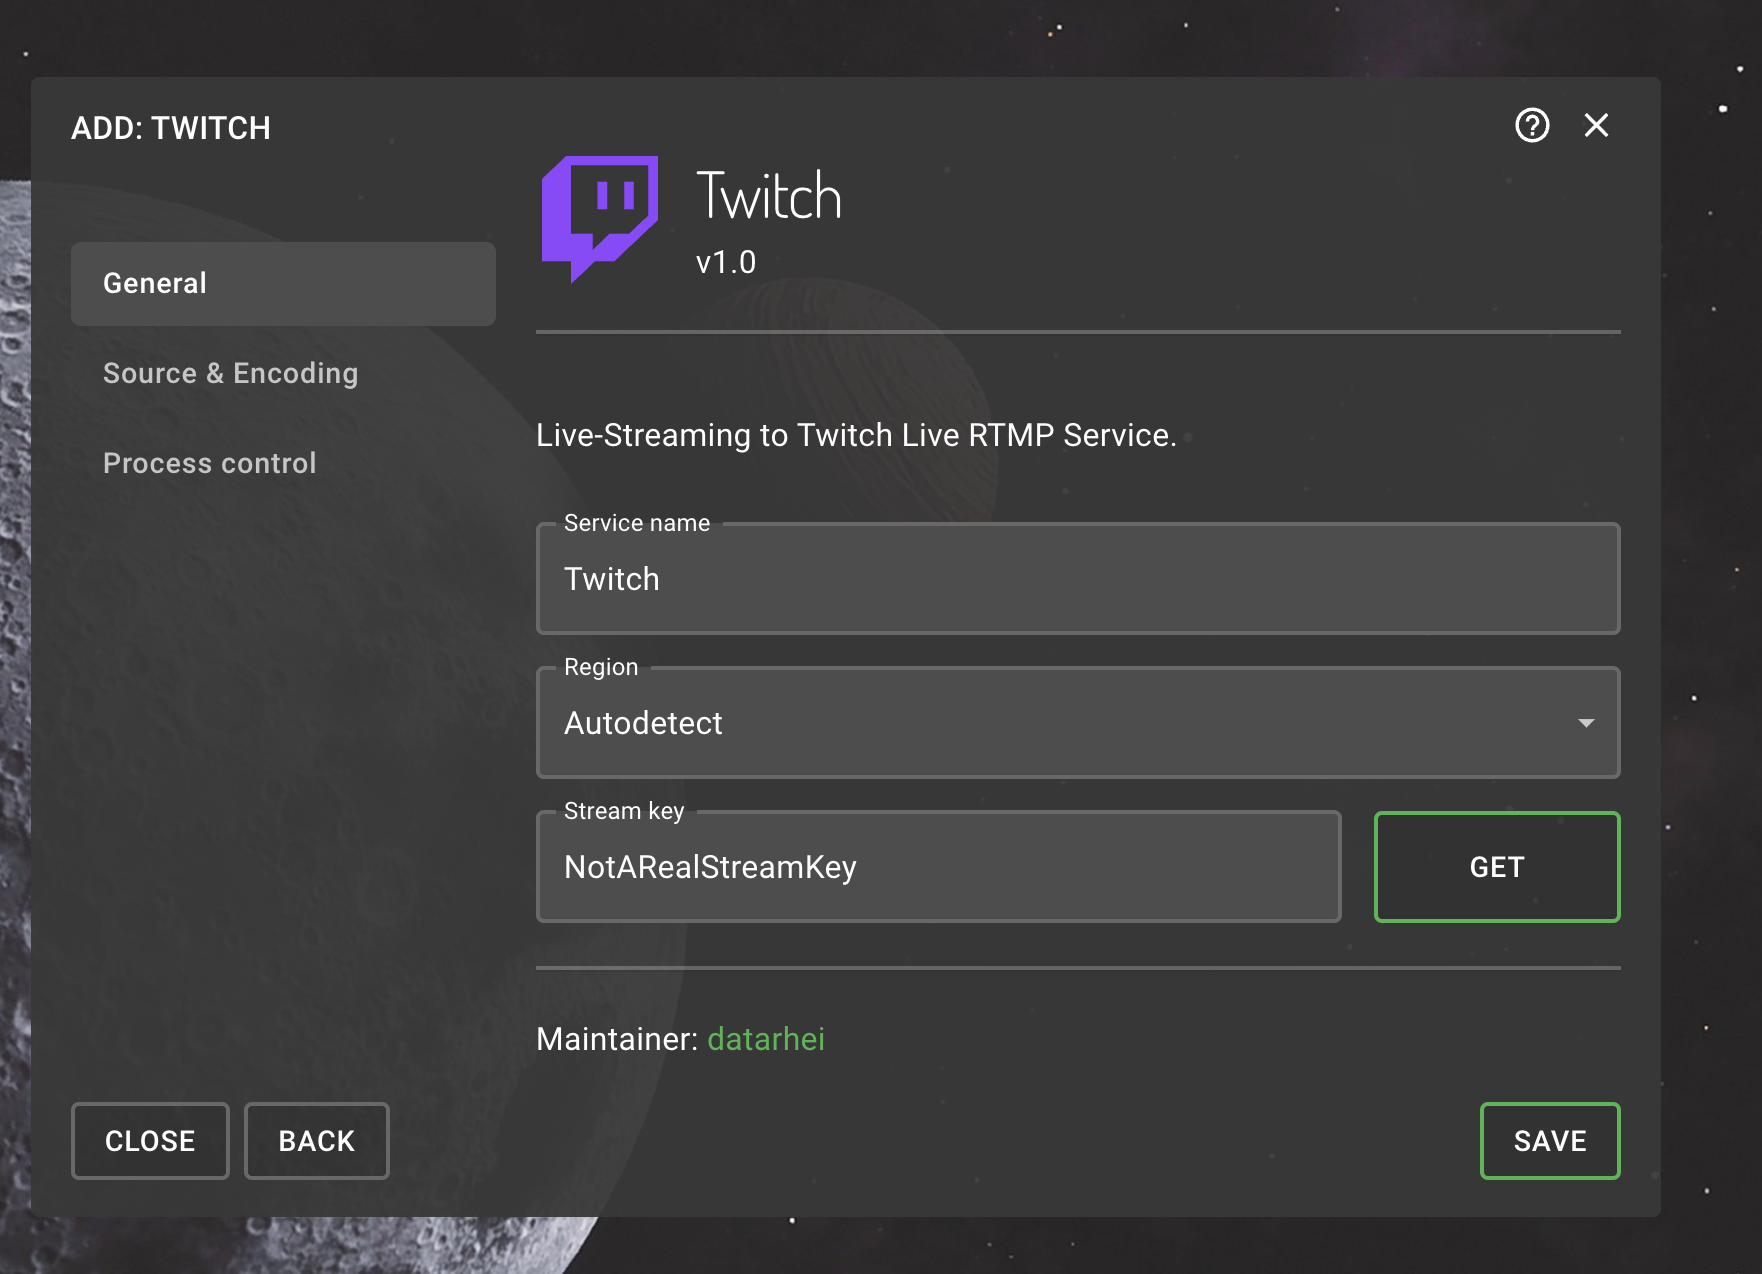
Select the + icon from the Publications panel in the Restreamer admin UI, then select Twitch from the list of services.
Paste in your Twitch stream key to the ‘Stream key’ form field, then click Save.
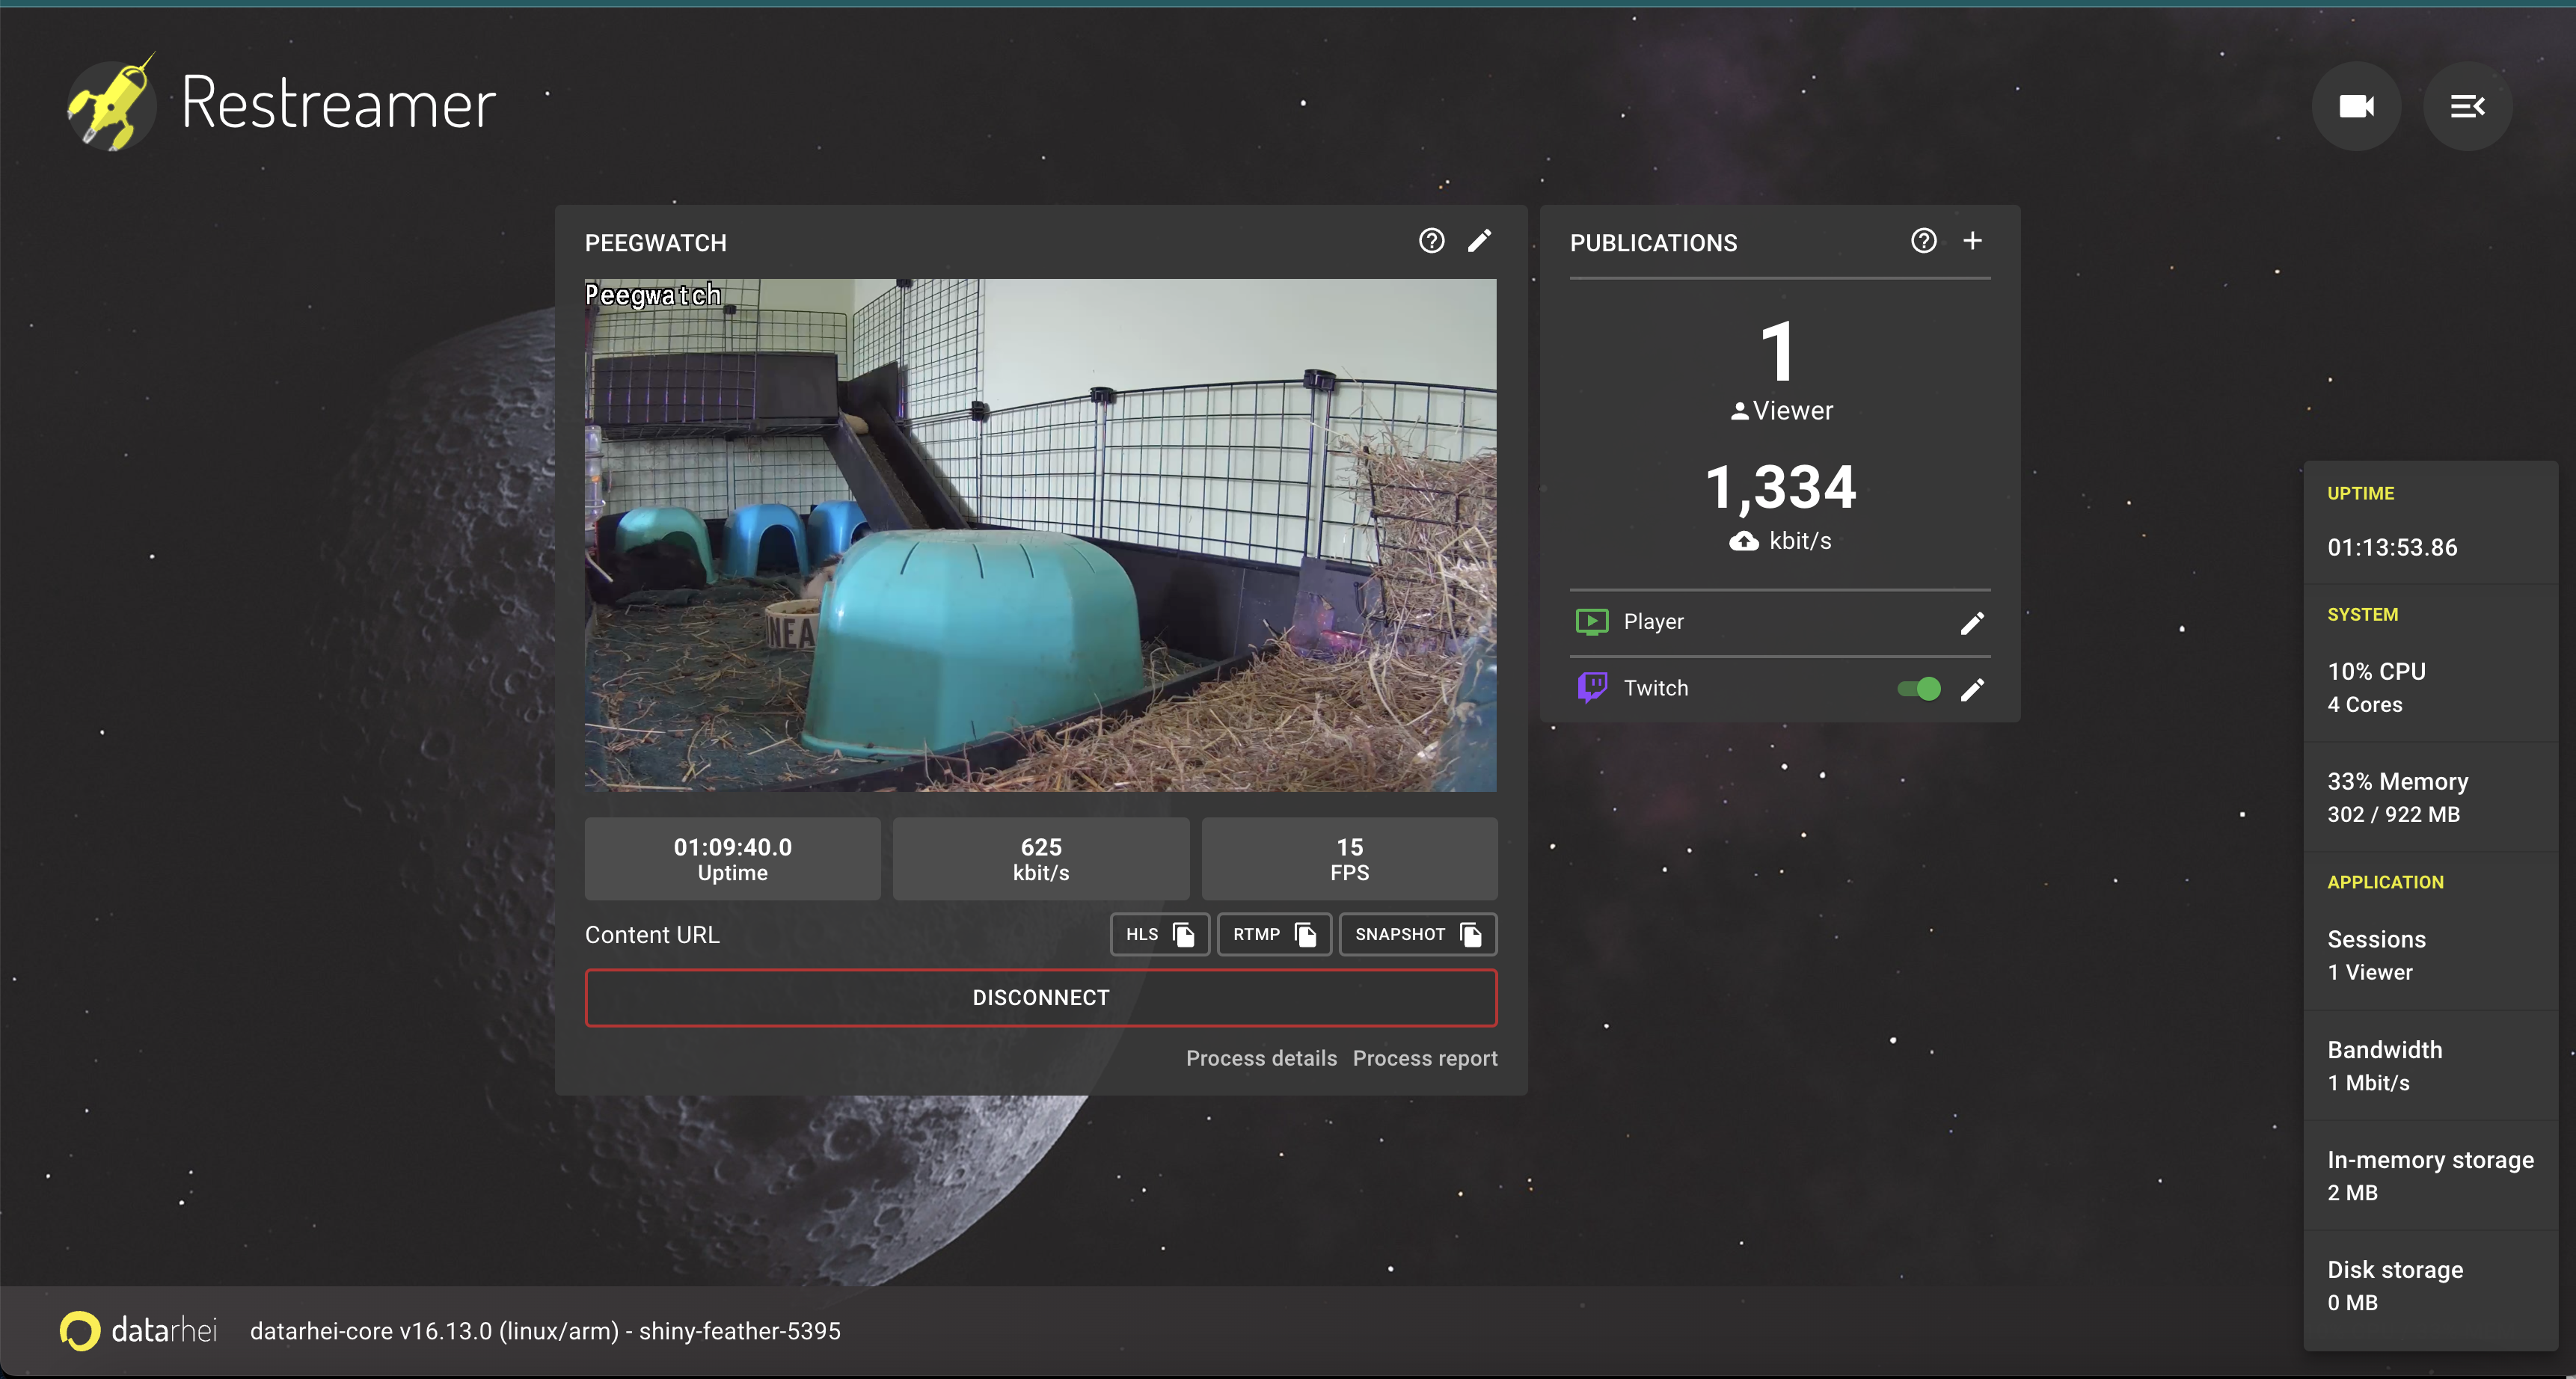
Now, visit your Twitch channel, and you should see something like this:
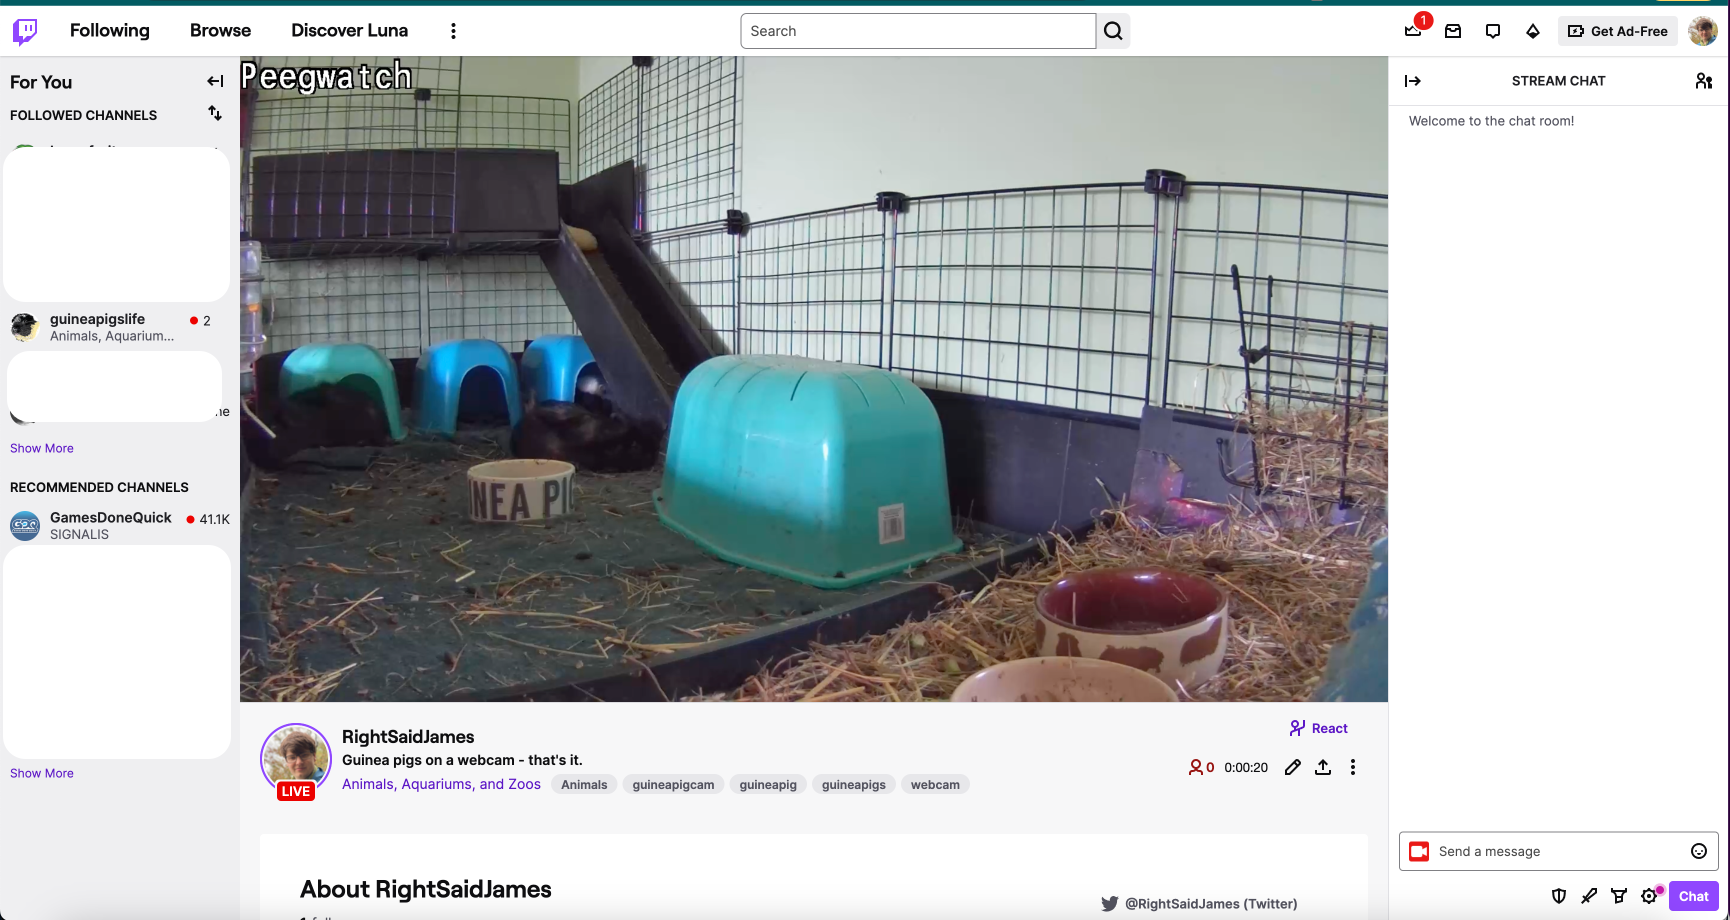
I won’t tell you how to configure your Twitch profile, gain followers or become a world-famous creator. But if you find out how to do those last two things, please let me know!
You can stop the Twitch stream by disabling the Twitch option in the Publications panel of the Restreamer admin UI. Clicking the ‘Disconnect’ button at the bottom below the video preview will also have the same effect. Alternatively, just turn off/unplug your Pi! When your Pi next boots up, Restreamer should automatically start back up again. If you turn off your Pi without disconnecting from Twitch or stopping the video feed, it should re-connect to Twitch soon after the Restreamer Docker container starts. If you disconnect from Twitch/your camera before turning off your Pi, it won’t reconnect automatically after a reboot.
Stopping or decommissioning your webcam stream
If you wish to pause your webcam stream, disable the Twitch option in the Restreamer app, or simply turn off your Pi.
Alternatively, you can stop the Docker container manually, in which case it will not restart until manually restarted or when the Pi reboots. This command will work regardless of whether you chose option 1 or option 2:
$ docker container stop restreamerAlternatively, if you set up your Restreamer app using docker compose, you can simply run this command from the same directory where you ran the up command:
$ docker compose stopTo remove the container and most of its related parts, run this command instead:
$ docker container rm restreamerOr, if you used docker compose:
$ docker compose downSome additional notes:
- If you gave your app a different name than
restreamer, substitute that name in the abovedocker containercommands. - Regardless of what method you use to stop/remove Restreamer, the files created by the bind mount will live on in your Pi’s local filesystem. You can remove this data permanently by deleting the corresponding
dataandconfigfolders.- You could also copy these folders and their contents to a different device running Docker, then follow the steps in Options 1 or 2 to recreate your Restreamer app without having to redo the config.
Restreamer Limitations
The solution described in this article is a great first step for replacing/automating a tool like OBS, but it’s not the full picture. For example, within OBS you can:
- Output multiple video streams (e.g. two IP webcams, or an IP webcam plus your face) in a single feed.
- Add static images, text and background audio.
- Allow users to interact with the stream (e.g. choose music, change lighting).
- Control the Twitch title/description and chat with viewers.
- Switch between different ‘scenes’ and display temporary overlays.
That’s not to say you couldn’t do any of the above using Restreamer, but all of this is beyond the scope of this tutorial.
Extra Credit
If you want to take this project further, here’s some ideas for follow-ups:
- Reduce stream latency by activating Restreamer’s RTMP Server, then enable it for your webcam feed and Twitch publication.
- Experiment with encoding and video settings to maximise FPS, video quality and audio quality.
- Set up another webcam in Restreamer so you have multiple sources of content.
- Instead of using a Wi-Fi webcam, get hold of a Pi-compatible webcam and add it to Restreamer as a USB device or Rasperry Pi Camera.
- Set up another Pi-compatible app/program that sits between Restreamer and your camera to modify/augment the stream (e.g. text/image overlay), or combine multiple webcams into a single Twitch stream.
- Bypass Twitch entirely by using Restreamer’s Publication Website feature. You can modify it to your needs with a custom template and/or HTML includes, then exposing it to the world using port forwarding and a dynamic DNS service.
- See my note in each of the Docker sections about mapping ports 8080 and 8081 to 80 and 443 respectively. Alternatively, you can keep the default ports, but map them when you forward them on your router.
Additional Resources
- My Twitch Channel (twitch.tv/rightsaidjames). If it’s not live at the moment, check out a recent broadcast and glory in the rodent antics!
- Use your Raspberry Pi as a streaming server – Opensource.com
- Datarhei Restreamer documentation, GitHub and website.
- In particular, check out their guide for IP webcams.
- (Almost) everyone’s an AV engineer in the COVID-19 era – rightsaidjames.com
- Pimoroni and The Pi Hut, two fantastic sellers of kit for Raspberry Pi and other hobbyist computer platforms. Both stores ship internationally.
- Twitch’s Dashboard, allowing you to preview and manage your stream. It has achievements to motivate you to build your stream, grow your audience and achieve Affiliate or Partner status.
- Twitch 101 (video/article), part of Twitch’s Creator Camp e-learning platform.
- *Non-affiliate Amazon links: Tapo C200, Tapo C210, consumer-grade webcams, powerline adapters.
Leave a Reply